Initace
A photo that sells shows the product clearly, on a calm background, from several sides, and loads fast. The customer cannot pick the product up, so its quality, size and colour are judged by the image alone. Below you will find the reasons photos in stores fail, and concrete steps you can take yourself, without an expensive studio.
Why photos in your store do not sell
Most photo problems come down to four reasons. It is worth checking your store against them before you start photographing anything again.
- The photo is dark or blurry. The customer cannot see the texture of the material, the seams or the finish, so there is no way to judge quality.
- The background draws attention away. A kitchen table, a patterned bedspread or random objects in the frame make the eye search for the product instead of looking at it.
- There is only one shot. A single photo from the front does not answer the questions: how does it look from the back, how big is it really, what is inside.
- The file is huge. A photo straight from the camera can be many times larger than needed and slows the product page. We write about how a slow page costs sales in the guide Why your WooCommerce store takes 4 seconds to load.
Notice that none of these points requires expensive equipment. It is about light, a tidy frame and preparing the file.
Background and light: a simple set-up to make at home
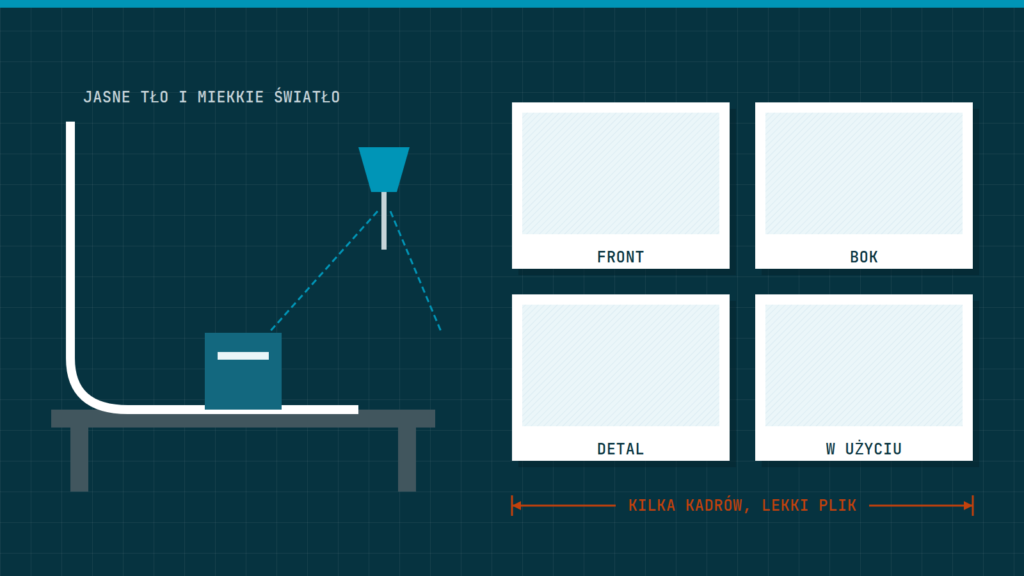
A plain, light background works best, most often white or very light grey. With it, all the products in the store look consistent, and the colour of the item is not distorted by its surroundings. A lifestyle background, meaning the product shown in a room or in use, is a good addition, but it should not be the only photo.
A phone with a good camera is enough for the photos, if you look after the light. Place the product on a table by a large window. Daylight, diffused and without direct sun, is the most flattering. On the other side of the product, set up a large white sheet or a piece of white card: it will bounce the light back and soften the shadows.
- Place a table by the window and lay a sheet of white paper on it that curves smoothly up the wall. That way there is no hard line between the table and the background.
- Put the product in the middle, and the white card on the side opposite the window.
- Turn off the lamps in the room. The yellow light of bulbs mixes with daylight and changes colours.
- Rest the phone or camera on a tripod or a stack of books, so the photos are sharp and have the same framing.
- Take the photo, zoom in on the screen and check the edges of the product. If they are blurred, refocus.
Which shots to show
A good habit is to use the same set of shots for every product. The customer then learns what to look for, and you do not forget any of them. Adapt the set to the goods, but start from this list:
| Shot | What it is for |
|---|---|
| Main shot, from the front, the whole product | this photo is visible in the product list, so it must be legible even at a small size |
| From the back and the side | shows the shape and elements not visible from the front |
| Close-up detail | texture of the material, seams, fastenings, engraving, label |
| Scale | the product next to a familiar object or in a hand, so the customer knows how big it is |
| In use | the product in a room or in action, showing how it is used |
| Inside and contents | what the customer will get after opening the package |
If you sell a product in several colours, each variant should have its own main photo. A photo of one version and a description saying “also available in red” raise the risk of a return, because the customer gets something other than what they imagined. How to build a whole product page around these photos is described in the guide Product pages that sell.
File size and format
File size is a feature the customer does not see but does feel: the page loads more slowly or the photo appears late. It comes down to two things, the dimensions in pixels and the weight of the file in kilobytes.
Choose the dimensions to suit the largest place where the photo will be shown. If the largest image on the product page is about a thousand pixels wide, there is no point in uploading a file several thousand pixels wide. A phone takes photos at a very high resolution, so you need to shrink them before uploading. Check in your store theme’s settings which image dimensions are used, and prepare the files accordingly.
The weight of the file depends on the format and compression. For photos, JPEG is most often chosen, or more modern formats that give a smaller file at similar quality. WooCommerce and PrestaShop can do part of the work themselves if the right options are on, but it is best not to count on that blindly: upload a test photo and see what it really weighs.
- Upload photos already reduced to the needed dimensions, not the originals from the camera.
- Save them as JPEG with moderate compression, so that no blocky artefacts show.
- Name the file descriptively, for example
red-leather-backpack-front-view.jpg, notIMG_4521.jpg. - Fill in the alternative text, a short description of the photo that screen readers read out and that shows when the image fails to load.
How to check the result on a phone
Most customers view the store on a phone, so that is where to check every photo. Open the product page and ask yourself a few questions. Does the product fill the frame, or is it lost in it? Can you see the details without zooming? Can the next photos be swiped through? Does the photo load straight away, and does the page not jump while loading?
A good test is to show the page to someone who does not know the product and ask what it is, what it is made of and how big it is. If they cannot answer, a shot is missing. Finally, compare several products side by side in the list: the background, brightness and distance from the camera should be similar, because then the store looks consistent and professional.
A list of steps for one weekend
- Choose one product and take the whole set of shots from the table above.
- Reduce the photos to the dimensions used in the theme and save them as JPEG.
- Name the files descriptively and upload them to the store with the alternative text filled in.
- View the page on a phone and ask someone to give their opinion.
- Make the fixes, and only then repeat the process for the other products, starting with the bestsellers.
In short: a light, calm background, daylight, the same set of shots for every product and files reduced to the needed dimensions. Photos do not have to be expensive; they have to be consistent and fast.
Want your store’s product pages to be fast and to show the goods well? We will take care of the store from design to launch or book a call, and we will look at your current pages.